Tuesday, December 11, 2012

The Rubber Cafe New release blog hop!


Today The Rubber Cafe is celebrating their new Jamie Dougherty Designs releases. These exclusive stamps are available for purchase at The Rubber Cafe Store! Here is a little bit about the stamps....
        These releases are perfect to use in your Project Life scrapbooks, mini albums, or projects you are currently working on. They are great with cards throughout the year as well. These sets are are beautifully done in Jamie's typical style and truly reflect her creative talent. 
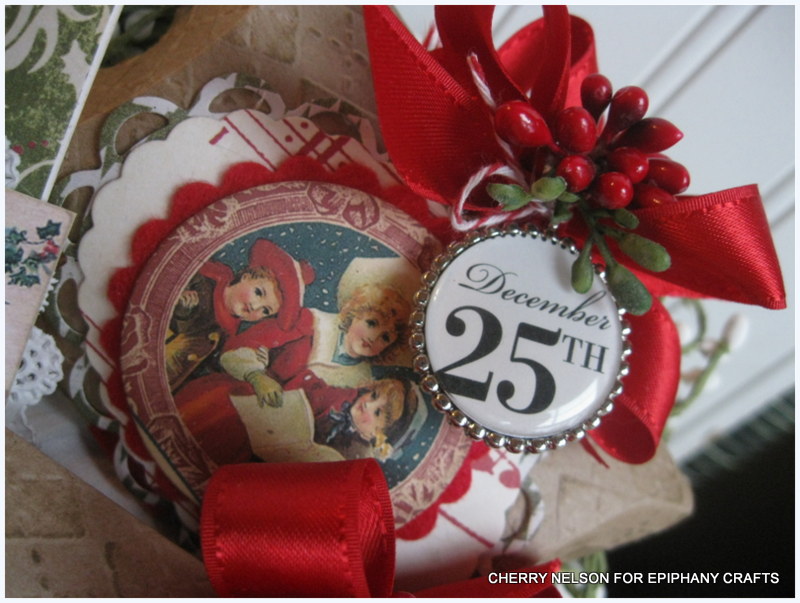
                    I wanted to show how they can be used on paper goodies...so I created a christmas tag set and also a Valentine card...yep.   I couldn't help myself!  I used the remember the moments   set ...which is perfect for holidays.  I simply cut the numbers apart to create my projects.  I used some of the sweet frames found in the set as my background for the Christmas tags and also used the solid holly set for added detail.  The Valentine card came together easily with some of the sentiments ...LOVE HAPPY.   How cute is that?   Perfect for Valentines Day..I think!   Hope you have enjoyed my take on the new realeases.   Here are links to the rest of the girls awesome creations !   Off to another basketball game!    hugs, cherry

Debbie- http://www.debbieseyer.com
Michele- http://creative-mayhem.blogspot.com/
Kristine-http://stampingandscrapingincalifornia.blogspot.com

Thursday, December 6, 2012

Wrapping it up with Epiphany Crafts


                                    I love to wrap gifts and love to create unique containers for someone special. I think it adds to the excitement when gift giving. I created a card and matching pillow boxes. I used chipboard pillowboxes and embossed them with an embossing folder for added detail.  I wanted an old time victorian look..Dickens style!   I simply diecut layers of papers and felt and added ribbons, greenery, and of course a couple of metal charms..which were perfect to adorn the boxes. I used another circle bubble cap on the card…to add importance to my JOY sentiment. So fun and easy!   I wanted to say thank-you for the well wishes!   I appreicate it.   Hope you enjoy!
                                                                                                       Merry christmas! Cherry


Epiphany Crafts Supplies:
Epiphany Crafts Shape Studio Tool Round 25
Epiphany Crafts Metal Charms Round 25
Epiphany Crafts Bubble Caps Round 25
other supplies- cardstock- PTI, pattern paper- Girls paperie, teresa collins
ribbon- Really Reasonable ribbon
Greenery and berries- Michaels
pillowboxes – Wplus9 stamps
images- etsy, Graphics fairy
Diecuts- spellbinders, embossing folder- cuttlebug

Wednesday, December 5, 2012

Winter birds...


Hi there...Cherry here with a quick post.  Just got home from a basketball game and I am feeling lousy...so I am just popping in to share two cards.  The first card was created for TRC.   I used the winter bird  stamp.  I wanted a soft look so I stamped it in khaki ink and left it silhouette style.   No coloring.   I think it will make a lovely winter greeting for someone special.  The second card I made just because.  I have had a bit of fun creating cards lately with a Winter theme.  It is always nice to have something to cheer someone up after the holidays when the Winter blahs can really take hold.  Loving the greys, soft blues that can be used for this.  Of course I always love birds.  Never tire of them.  Well this old body needs sleep.  Thanks for visiting me and always letting me share with you.   cherry


stamps- winter bird
paper- scrap, cardstock - pti
ink- pti
buttons- vintage stash
diecuts- sei
ribbon- really reasonable ribbon
adhesive- scrap happy glue

Monday, December 3, 2012

Handmade..especially for you


HI there!  Happy Monday! I have a project here to share made for Really Reasonable ribbon  .   I took a little break from christmas crafting and decided to make a little something else.  I love to sew...don't do it nearly as often as I would like.  I  used a spellbinders die to cut my heart shape and than sewed all the way around leaving a bit open to stuff a bit of fiberfill.   I added a cute fabric label..and added some fun stick pins....I used red satin with a grosgrain edge  for the back to hang.  I also used some red and pink   seam binding to sass it up.  Would make a great little present for the sewer in your life...or a crafty gal!   Hope you enjoy!  cherry

Thursday, November 29, 2012

Happy girl...


     Greetings to you all! Feel like I have not been around much.   I am a bit of a frazzled wreck ..feeling out of sorts.  Winter blahs I suppose...even though it isn't officially Winter yet. So I have been grabbing the chocolate.  It cures everything right? 
                                       I am always happy though when I get to share Pink Persimmon   goodies with you.   A good way to cheer one up!   The first card was made using Happy Girl  and Vintage greetings stamps.   I love anything to do with sewing.  Reminds me of my  Mom.  Something so homey and warm about it.  I love the Happy girl stamp (including the name)....so many things you can do with it....fill the inside with buttons, flowers, another stamped image.  So fun!  I kept mine soft and feminine.  I fussy cut her little dress to add a bit of detail.  Added a few little touches..ribbons, tiny millinery flowers, and my sentiment.    The other card uses what may just be my all time favorite stamp...sweet heart silk card .  The size of it is larger and makes a great backdrop for other things.   I chose to wrap mine with lots of yummy seam binding...kinda mimicking silk embroidery thread.  I added a big rose cabochon and vintage stick pin..and couldn't help but add a mini tag with a stamped cameo image from the mini silhouette set for a bit of added vintage goodness!  Well that is it for me...can't wait to share other projects using these stamp sets!  Make sure you check out the Pink Persimmon blog for more inspiration.   I am always in awe on how others create with the same stamps and their unique take on them.   Night, night!  Hugs, cherry

Wednesday, November 28, 2012

Winter tree.....


Hi there Cherry here to share a card using the Pine tree stamp. Which is on sale right now! I peeked around a bit and saw some great sales over at TRC.
               I knew I wanted try some faux snow on this stamp the first time I used it and decided today was the day! I stamped it in white ink first and let it dry. I than used a small paint brush and lightly went over the image with snotex. Other than that I added my layers, ribbons, and some little details like the red jellie dots. This would be lovely all in blues for a Winter look as well.  Well I am going to bed!  My son's first highschool basketball game is tommorow....freshman on the varsity team.  so proud of him!    Hope you enjoy! cherry


 stamps used- Pine tree
cardstock- pti , pattern paper- graphic 45, october afternoon, creative imaginations
ink- pti- fresh snow, faux snow
ribbons- really reasonable ribbon
berries- michaels
sticker- sei
buttons- stash-
jingle bells- joanns
mini paper clips- tim holtz
jellie dots-red jellie dots
adhesive- scrap happy glue

Friday, November 23, 2012

Christmas Bow tutorial


               How was your Thanksgiving?  Mine was lovely and simple.  Lots of yummy food and the blessings of my Mom, Dad, husband, and son...and of course the animals.  We gathered around and ate and than chit chatted.  So thankful for simple times like that. They are the memories I hold most dear.  Hope yours found you well and happy...and full of pumpkin pie! 
                              Now that thanksgiving has passed, it is definantly time for full on holiday crafting. Have you started?  You better get to crackin....it will be here in a New York second.   It always comes faster and faster each year. You can never have to many holiday cards in your arsenal. With cards comes bows..so I thought I would share my bow method again using my beloved red seam binding from Really Reasonable Ribbon  .  You know me and my cheating...it is so much easier to use separate bows... and for me the best way to go about getting that perfectly imperfect crumpled look I love.  I did a full wrap around on this card...wrapping all the way around the cardstock and tieing a bow near the top.  I wasn't too concerned with the first bow.  I than added a few of my paper diecuts to the card base.  Than.. as you can see in the second pic I tied my second bow and adhered it.  I use hot glue.  I am too impatient to wait.  I always hold it there for a second with my finger right in the center which causes the ribbon around the bow to "poof" up..which I like.  I also sometimes will wet a paper towl just a smidge and wrap  my ribbon in it lightly to crumple it up again.  I notice sometimes when you start playing with it it can start to straighten back out .  I usually use two separate bows..but once in awhile will add a third if it is not full enough.  The trick is to alternate the bows so they criss cross each other.  Easy peasy.  From there it was just a matter of adding my goodies to the card and I was done!  I would love to hear if you tried this and it worked for you!  Hope you enjoy..and I didn't confuse you too much!  Happy craftin and hugs, cherry
                                                          
        Ribbon-  Really Reasonable Ribbon Red Seam binding
        Cardstock- Wplus9 stamps
        Pattern paper- Pretty Little Studio Home for Christmas
        Diecuts and images- Pretty Little Studio Home for Christmas
        Buttons- my vintage stash
        Candy cane- TJ Maxx
        Paper fringe- handmade by me