Goood Morn...and happy Monday! It is Crafty Secrets linky party time! We were all challenged to create something for Mother's day, babies, graduation, or gardening. I chose to create a personal gift you could give to Mama! I grew up with my Mother sewing and so I created several sewing theme pockets with matching tags. I used images from sewing ephemera kit, and paper from the creating vintage with vintage patterns cd. 1) I printed out the images I wanted and scored the blue bird envelope first and gathered my other images together. 2) I than grabbed my file folder and cut it down covering it in papers and stitched up the sides. 3) I glued chipboard to the backsides of my spool images to create more depth to them and inked the edges. 4) I than grabbed my layers and images and started adding them to the file folder and added my trims. 5) From here I created my inside tag adding goodies as I went. This is the time to really play and add things to make your creation really unique. On each piece as you can see I repeated my colors.....red, blue, and yellow. This way even when you have different images and adornments things stay cohesive. I also repeated my washi taps and ribbons all adding to the theme. I had to snap pics of the other side of the blue bird envelope....isn't it cute? Loved it so much I had to print out a mini of it and used it on the inside tag! I adore how these images all work so well with my vintage embellishments...a match made in heaven! Hope you enjoy...and check out all the other ladies gorgeous creations! hugs, cherry
Monday, April 7, 2014
Mama's sewing pocket...
Goood Morn...and happy Monday! It is Crafty Secrets linky party time! We were all challenged to create something for Mother's day, babies, graduation, or gardening. I chose to create a personal gift you could give to Mama! I grew up with my Mother sewing and so I created several sewing theme pockets with matching tags. I used images from sewing ephemera kit, and paper from the creating vintage with vintage patterns cd. 1) I printed out the images I wanted and scored the blue bird envelope first and gathered my other images together. 2) I than grabbed my file folder and cut it down covering it in papers and stitched up the sides. 3) I glued chipboard to the backsides of my spool images to create more depth to them and inked the edges. 4) I than grabbed my layers and images and started adding them to the file folder and added my trims. 5) From here I created my inside tag adding goodies as I went. This is the time to really play and add things to make your creation really unique. On each piece as you can see I repeated my colors.....red, blue, and yellow. This way even when you have different images and adornments things stay cohesive. I also repeated my washi taps and ribbons all adding to the theme. I had to snap pics of the other side of the blue bird envelope....isn't it cute? Loved it so much I had to print out a mini of it and used it on the inside tag! I adore how these images all work so well with my vintage embellishments...a match made in heaven! Hope you enjoy...and check out all the other ladies gorgeous creations! hugs, cherry
Friday, April 4, 2014
Given the birdies a home.....
Spring has sprung around here...even though we had snow just the other day (true story). I can hear birds during the day and frogs at night so I know it is close at hand. I decided to get some Riddersholm goodies out and create something Springy for Mother's day. I went with a non-traditional color palette for this card. I used the check pattern from the new Our Country Christmas line and the black is from Huntington Gardens. Love red and black together! I added some sweet clouds, and the most ADORABLE birds and birdhouses chipboard pieces. I ran them through a Sizzix embossing folder (which worked so well) and than inked the edges a bit. Other than that a few bits and baubles and tea stained twill from Really Reasonable ribbon and I was done! Hope you enjoy! Cherry
Thursday, April 3, 2014
Precious Baby girl
My turn over at the RRR blog today! I go through creative spurts with mini albums. They take a lot of time but once done, I feel like I really accomplished something. Baby albums are some of my favorites to create. This one uses lots of pretty papers from Martha Stewart and Crate Paper. Very soft and girly. I used old gingham fabric on it with stitching around the front frame, as accents on the inside, and on the back page. The back is just as pretty as the front. I sandwiched fleece and fabric to create a puffy heart. I added a Maya road flower, snippets of vintage lace, and a colored stamped image from Crafty Secrets. I also stitched up some index files and decorated them up and added them. Great place to add memorabilia, memories of baby, or snap shots not yet added to the book. This is one of those projects so fun to add ribbons too...I used the burlap center stich in pink on the ring clips as well on the inside bottom on alternating pages, plaid ribbon in pink, and diamond satin pearl pink all on the ring clips. I also used the Rachel white crochet lace on the bottom of some of the pages. I love collecting little things to make each page precious...I added painted chipboard pieces that I gussied up with Crafty Secret stamps, flowers, banners, mini envelopes, and of course a few sweet pink buttons to tie it all together. Lots of fun! Hope you enjoy and get a few ideas for your next album! hugs, cherry
Tuesday, April 1, 2014
buttons and flowers challenge...
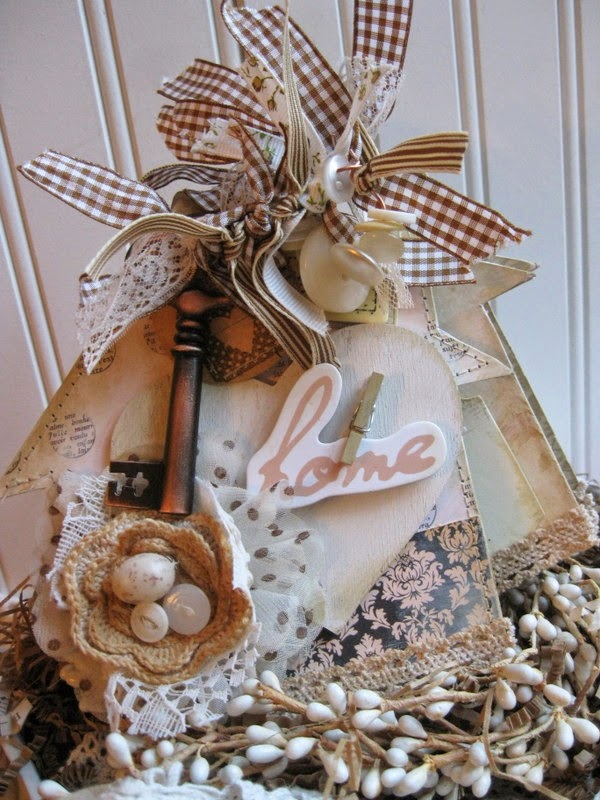
April 1st means a challenge over at the RRR blog. Way better than an April fools joke..I think! My husband already got me good. The challenge was using ribbon with buttons or flowers..or both! I decorated this little chipboard house...covering in papers, stitching, and paint. I used several yummy ribbons at the top...delicate rose grosgrain ribbon, gingham brown ribbon, and Melina white crochet lace that I tea stained. I added charms, a key, little stamped image amongst the ribbons as well. Each "house" has sweet little home images along with fun embellies. The front has a shabby layered flower that I added a tea stained crochet flower with an egg and buttons. Hope you enjoy and play along with us! hugs, cherry
Monday, March 24, 2014
Cupcards to Go reveal!
Eeeeeeeeeeeeeeek! Time for a Cupcards To Go reveal! Spring in every little nook and cranny of this sweet kit. It is called Blossom. Lots of yummy papers and adorable embellishments. What I really loved about it was the sentiments. Just happy and full of expressions that make you smile. A great pick-me-up for a friend. Make sure to stop by and check out the gallery of the girls...I have seen the sneak peeks and there are some great ideas and inspiration! Better grab one these fast before they sell out! As always thanks for visiting! cherry
Subscribe to:
Posts (Atom)


