Happy Sunday evening to you! I have been busy , busy, busy! I sat down today and played a bit today though. I always have fun trying to use unexpected things in my projects...something that makes things uniquely me. I LOVE old china plates....as I know many of you do too. I have had fun using antique saucers on my pockets of late. I have used vintage silverware on cards and pockets ...so why not plates? I love the whimsy of it. I filled the pocket with several old fashion cards....I made a handmade bloom out of left over scraps from a vintage hankie and some tea stained linen and used some bead stamens from Pro 31 Designs . It made such a pretty flower with the beads. I also used some lovely bead style trim to the bottom of each card from Pro 31 Designs as well. Just some yummy and unique toppings that I know I will turn to again and again. Hope June has been good to you...and Hope you enjoy! hugs, cherry
Sunday, June 24, 2012
Saturday, June 23, 2012
Really Reasonable Ribbon tutorial
Hi there! I am here today to share a tutorial for Really Reasonable Ribbon. I thought I would share how to gussy up a few of the sweet Middy biddy kraft polka dot bags. I gathered up my goodies...and went to work starting out with a large doily, some kraft envelopes, and some of the yummy natural burlap ribbon in teal. I also gathered up a few embellishments of course! I adhered my ribbon, doily, and envelope first. I cut my burlap ribbon into a dovetail at the end. I also used some white ink around the edges of the envelope to shabby them up. I used a few digital images from etsy and stitched around the edges and adhered them. I added my 3d stickers (butterflies/birds) and some buttons for fun. On the one envelope I also added some Penelope crochet lace as well. It was time for my big chunky bow at the top of each and other than that a few velvet hydrangias and I was done! These are large enough to add several cards to or a bag of candy. Hope you have enjoyed! hugs, cherry
Thursday, June 21, 2012
The Scrappy Gourmet...
poppin in again with a late night share! It was hot and muggy today.....I spent part of it in a sultry hot gym...watching my boy play ball. Thank goodness for ice cream! I wanted to share a few sneaks with you of some projects that I have been working on for The Scrappy Gourmet. I had so much fun putting together a couple of kits that will soon be available there. They are full of yumminess and lots of whimsy. Hope you enjoy! Can' t wait to share everything soon! Night, night and hugs, cherry
Monday, June 18, 2012
Pro 31 Designs....
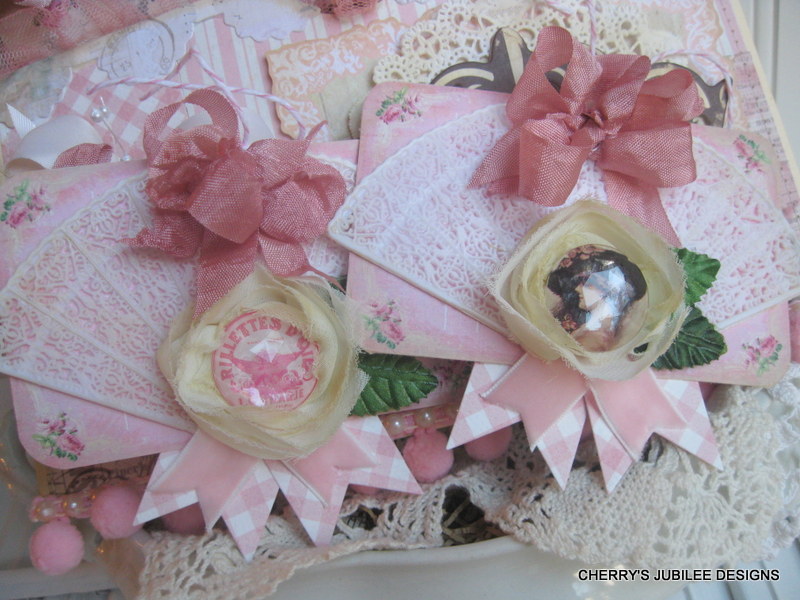
So Monday has about come and gone and I popped in for a spell to share a project I made using many unique little trinkets...bits and bobs that come from Pro 31 Designs. I wanted to create something over the top girly....very pink. Uber feminine..... and it did my heart good! I had so much fun with this stinker! I used pearl trims, bead sprays, crystal style pendants...both large and small, paper mulberry roses, ruffle laced trims.....all from Pro 31 Designs. They have so many unique things to make your projects special! I had fun using the fans.....goes right along with Ms. Marie Antoinette...dotcha think? Love the images I found on etsy of her. I added some lovely crystal style cabochons....cameos....vintage trims..and of course some pom pom fringe. Been diggin it lately. fanciful and a bit flirty. I even had to spray paint my metal fleur de lis....LOVE It in pink. Ballet slipper pink to be exact. I topped my project off with lovely seambindings from Really Reasonable Ribbons. Hope you enjoy...happy evening to you! hugs, cherry
Friday, June 15, 2012
French Country..
Hello to you all! Hope you are having a happy Summer so far. I popped in to share two cards I made for TRC. I just love the versatile stamps in the set Card Labels . Been having fun using it in diffrent ways. It is a great set to frame something out with. I went to work covering my cardstock with my frenchy theme papers. I stamped all 4 labels and cut them out. I also used the oval scallop diecuts from Spellbinders for added layering. I cut one of the card labels and used it at the top and bottom of my butterfly card. I used both the Fabulous phrases and the cute I adore you for my sentiments. I stamped the I adore you inside my butterfly card and added a button and tails for added detail. I also of course added some fun toppings...some chipboard pieces, tea stained twill, little flowers, etc. Of course I used my scrap happy glue for all my glue needs! I love, love, love this glue...and need to get more! Hope you enjoyed my shabby frenchy feel cards! hugs, cherry
Thursday, June 14, 2012
Night owling it.....
Popping in at the strike of midnight.....night owl that I am! I love Summer and staying up being creative...windows open listening to crickets and frogs. Another thing I love is old fashion silhouettes. I fell in love with these Glitz diecut stickers....just for that reason. i have a small collage of them on one small wall in my hallway. I love pairing the black with pale pink. I made a pocket with a couple of cards....I love that pockets are big enough to hold my cards. They are usually to thick to put in a normal envelope. I added a gorgeous large bloom...some crochet lace I tea stained..from Walmart. Who knew? Couple of other little bits and bobs, and some lovely bead spray from Pro 31 Designs. I love love that old fashion feel....sigh....hope you do too! Night, night and hugs, cherry
Wednesday, June 13, 2012
Hooray for the Red, White, and Blue!
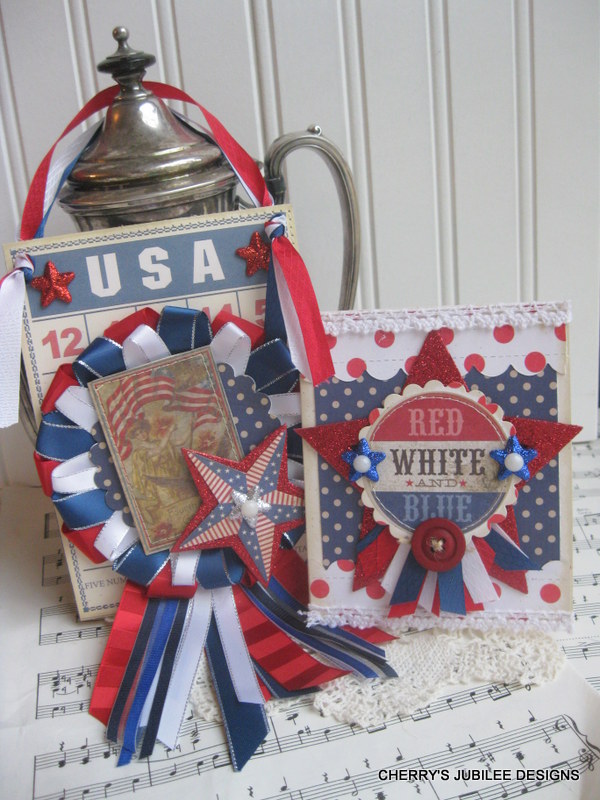
Hoorayyyyy! It is time again for our blog hop with Really Reasonable Ribbon using the June Ribbon club assortment. You should have found your way here from Ms. Gloria's place. This assortment of ribbons happens to be one of my favorite color combos....red, white, and blue! I made three projects...two being patriotic and one just for fun. I made a card using patriotic polka dots and diecuts..and added the ribbon club assortment for tails ....this is a great way to use up small snippets of ribbon that you would rather not throw away but don't know what to do with. The larger project used a bingo card and with an old fashion ribbon award rosette for the center. I just simply diecut a circle from scraps and started with one of the wider ribbons and cut approx. 10 pieces of ribbon and created loops from each one and adhered them one by one. I repeated this each time with each diffrent ribbon color. I than adhered my embellishments ...my image, and glittered star , etc. and laid this aside. Than it was time for my ribbon tails....I cut them all the same length as well and layered them and stitched them at the top and than adhered them to the bingo card. From there I just simply placed the "ribbon rosette" part on top and glued it in place. Lots of fun to make...I plan on doing a shabby version soon. I also wanted to make a Non- patriotic card....I used the pretty diamond ribbon in red...for the card. Just a cute kitschy card. I wrapped the ribbon all the way around the card and layered bow after bow for a full effect. Well that is it for me! Your next stop in the blog hop is Emily's Make sure to visit the other girls in the hop to see their take on the ribbon club assortment too! hugs, cherry
Subscribe to:
Posts (Atom)