Wednesday, September 26, 2012

One lone pine tree....


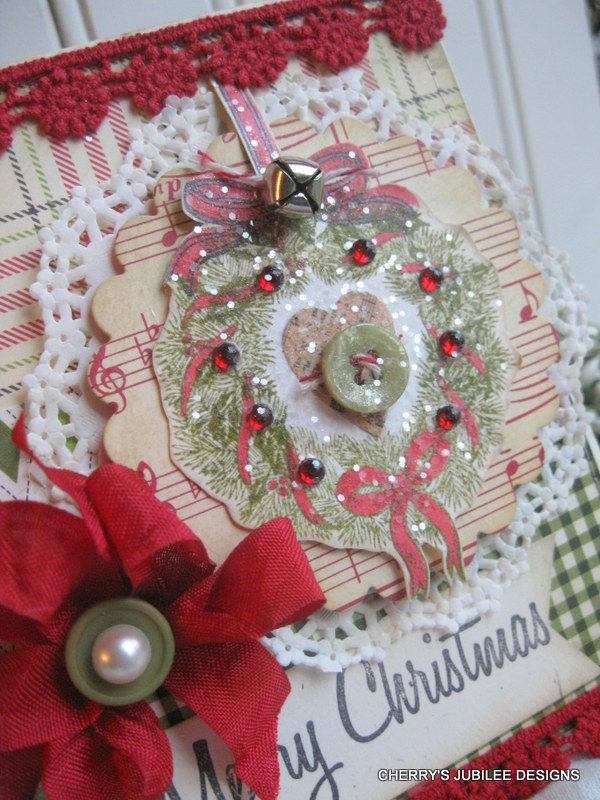
Hello Cherry here with another simple country Christmas style card. I fell in love with this Pine Tree stamp from The Rubber Cafe. I knew it would work perfectly with Melissa's technique that I shared awhile back using the Scrappy Happy glue on the back of your chosen stamp. It worked perfectly and really brought the detail out on the tree. I used the Hunter green you re so fine glitter which is a gorgeous color! It pairs so well with a Christmas red. I really kept my card simple because I wanted my image to stand out. I used one lone button and a bit of ribbon with bells. Other than that a few layers of papers and that was it. I can't wait to use this stamp to make a few wintery tags...maybe with the tree flocked. So many fun ideas floating in my head! Hope you enjoy! Thanks for letting me share. hugs, cherry


cardstock- pti, pattern paper- simple stories, cosmo cricket
stamps used- Pine Tree
adhesives used- scrap happy glue
red velvet- Really Reasonable ribbon
red satin- walmart
embellishments- jingle bells - Michaels, buttons- stash, doily- walmart
glitter- You' re so fine hunter green

Tuesday, September 25, 2012

Pink Persimmon


                         Happy Tuesday....did you get through Monday ok?   I am trying to get use to shorter and shorter days.   Losing daylight does not make me happy.  It is fun though this time of year to get the ole crockpot out.  I have been making yummy stews...and also made my first batch of pumpkin bread for the year.  Ahhhh cinammon and pumpkin puree how I love thee!
                                   Today I have my first EVER post for Pink Persimmon stamps
     I am so excited to be a part of their team!  I have loved their stamps for several years now.  They have new releases, one being the Parcel Post stamp set and the other Special delivery.  I used both in my first card.  Just a simple shabby card done in neutrals for a friend.  I used the posted stamp up in the corner making sure to stamp it first on scratch paper so that the stamp wore off a bit.  I stitched the postcard and stamped friend on it from the style girl set.   I fussy cut the parcel post label for fun and added some old buttons.  I like how versatile both sets are...the second card I did up for Christmas.  Using the Post card image again done in red this time.  I also used the sweet Holly Wreath set which has the adorable Santa image.   I had fun coloring him and the wreath stamp a bit and glittering him up with distress glitter.  I than added a bit of mica flakes to him.  So much fun....I am not big on coloring images...but did buy my first copic the other day.   So we shall see where it leads me.   Hope you enjoy!  Thanks for letting me share.   hugs, cherry

Sunday, September 23, 2012

RRR altered block tutorial


It is officially Fall now and I am guilt free in posting fall and spooky projects to my heart's content.  I have been hoarding a few wood blocks and decided to play around with one. I love the old primitive ones from the good ole days with the sweet nostalgic images.   The ones I have are solid wood and quite heavy.  I painted it and sanded the edges a bit.  I than grabbed some fun embellishments and some yummy RRR ribbon and started embellishing the block.
                    I wrapped my burlap ribbon in black around the whole block and hot glued it down.   I added vintage style images to both sides and than made my bow for the top.  I covered some chipboard frames with papers and added them to the images.  Of course my top was way to plain jane so I added  more ribbons for fullness.  I used seam binding ribbons that I crickled and aged with distress ink.  I also added a chipboard stamped tag wound with Halloween's bakers twine.  A few more little goodies...buttons, a droopy houndstooth daisy, and some diecuts and I was done...almost.  I sprinkled the block all over with some mica flakes.  It kinda turned out vintagey...but primitive.  I love that combination and can't wait to set it out on our new kitchen counters with some berries.  Hope you enjoy!  hugs, cherry

Wednesday, September 19, 2012

Paper Nudge....


Paper Nudge challenge #1!
 
                              
                                      Andrea's gorgeous take on the challenge!


                                                  Geri's beautiful take on the challenge!


Hey there!  If you scroll down my post for The rubber Cafe is right below!  I wanted to pop in and let you know that today is Wednesday which means over at the Creative Paper Trade blog we have a delightful challege for you...see the pic of the alphas up above?  Yep that is the inspiration behind all of our projects!  Fun, huh ?  Every wednesday there will be a different
challenge to wet  your whistle!  I had so much fun with this! 
I used some of  Andrea's  gorgeous felt creations and digital art work for this card.
 
 I decided to give some sparkle to the card and gave it a sprinkle of mica flakes for fun.
 
Hope you enjoy and go on over to the CPT blog for more inspiration.  WE would love to have you join the challenge as well!  enjoy!  hugs, cherry


A few of my favorite things...


Yes it is Fall but YES I skipped whole heartedly over it into Christmas. At least for today! I popped in to share a project made for The Rubber Cafe. I had "The Sound of Music's " song " A few of my favorite things" in my head when I grabbed the Pine Wreath stamp. I think it is obvious I love wreaths....all kinds. Grapevine, ivy, boxwood. Something so homey about them. I think every home should have one, and they are definantly one of my favorite things for Christmas! I stamped mine onto some rustic cardstock and than stamped the "ribbon holder" from swirled ball with hanging ribbon stamp onto the top of that to make the wreath look like it was hanging from the ribbon. I colored the ribbons in with a red Faber Castell pen. I than used the solid holly set set ( the small one in the set) to add more detail to the wreath by layering it here and there on top of the image. From there it was simply time to do some fussy cutting of the wreath. I added some foam adhesive for demension. I layered the wreath behind a doily and a spellbinders scallop circle diecut. From there of course I HAD to add a few sweet holly berry red jellie dots. A little paper heart and button, a mini jingle bell, and of course some mica glitter for an extra bit of sparkle and my wreath was done ! I had to have a sentiment and decided to use the Merry Christmas in bold sentiment. Love the nostalgic feel of this font. I loved making this card. I hope you enjoy! hugs, cherry


papers used- cardstock- pti, pattern paper- authentique, october afternoon
stamps used- pine wreath, swirled bal with hanging ribbon, solid holly stamp, merry christmas in bold
embellishments- holly berry red jellie dots, buttons- vintage
diecuts- spellbinders scallop circles
lace- Michaels
red seambindings- Really Reasonable Ribbon
adhesive- scrap happy glue, stick "em" up tool

Saturday, September 15, 2012

Happpy fall


How can it be that Fall is just days away? Officially that is.  It has been quite dry here and there are forest fires still in the surrounding area.  So rain would be a welcoming sight.   We are starting to get use to our schedules and the activities that come with school.  We are busy with football practices and games.  Something that I am trying to get use to.....seeing my son hit and taken down.  Why must football be so brutal?   I must toughen up.  I'm getting there. 
I know I have already shared several halloween projects, but I realized I havn't done anything just for fall.  I pulled out a few things in rustic oranges and browns.  Some fun diecuts and stamps and had fun just doing a couple of fallish cards.   I really enjoyed these colors...very warm and comforting.
Hope you have enjoyed and as always thank-you so much for letting me share!  hugs, cherry
 

Friday, September 14, 2012

Creative Paper Trade...


Hi all!  I wanted to share a fun new place....Creative Paper Trade .  All started by my friend Andrea , who you very well may already know.   She is uber talented and makes some of the sweetest goodies....things that I have trouble laying down.  I am part of her new design team she has put together...which I am so excited to be a part of.   I would love to have you go on over and visit and learn more about the other gals on the team.   There will be give-aways and starting on the 16th challenges every week to get us all inspired.  You are encouraged to be a part of the creative process!  This is  my first creation made for the blog.  Lots of softness and sweetness...holding on to a bit of Summer perhaps?   Hope you enjoy and make sure to comment ...you might win a little something something!  hugs, cherry

Thursday, September 13, 2012

RRR September Blog Hop


           It is that time of the month for the September Really Reasonable Ribbon blog hop! You should have found your way here from my gal Gloria's .   The september ribbons  are right up my alley!  All full of Halloween holiday cheer!  I had so much fun playing with them.  I had a large kraft bag and you know me and bags.  I had to deck it out with Halloween finery.  The ribbons were the icing on the cake.  I simply tied bow after bow at the top of the bag.  Love how the colors contrast and play off eachother.  I also used them on a couple of smaller bags that I tucked in the larger one.  So cheerful in a Halloweeny kinda way!  Now your next stop is Ms. Emily's .  Make sure to check out all the girl's gorgeous creations.  If you get lost just start back at the rrr blog.  Have fun!  hugs, cherry

Wednesday, September 12, 2012

More Halloween goodies...


Hi there folks! Today I have a quick little project for Really Reasonable Ribbon .   Yes...it is another Halloween project.....I can't stop making these treat bags.  I JUST can't.  This time I double deckered them and put a mini pocket onto a larger pocket.  Yes.  I think I need help.  O ' well I had fun.  I used some fun papers , buttons, glittered chipboard stars, some fun stitched vintage style images and of course oodles of ribbons.  Yummy Halloweeny style ribbons.  I used it for bows and borders and for tails on one of the pockets.  I also had fun using tulle for the bottom of each pocket.  I think my favorite is that sweet Halloween twine.  How cute is that?  Well that is it for me.  I appreciate you visiting me!  Hugs, cherry


ribbons used-  sheer organza in black,  mini black pom pom, Halloween twine, two tone textural ribbon in orange, black ribbon from september club assortment,